Garage Door Spring & Opener Repair Guide in SF Bay Area:


A focused, practical guide to garage door spring and opener repair in the SF Bay Area, this article explains common failures, local cost ranges, expected timelines, and the exact steps technicians take during diagnostics and repair. Homeowners will learn how to identify torsion versus extension spring problems, recognize opener malfunctions, and decide when repair makes sense versus full replacement. The guide highlights typical Bay Area price drivers and emergency-response premiums while offering a homeowner maintenance checklist to reduce surprise breakdowns. Read on for a technician workflow that details tools, safety protocols, and post-repair quality checks so you know what to expect during a service visit. This resource uses current repair practices and semantic troubleshooting steps to help you save time, avoid unsafe DIY attempts, and budget for common garage door services across San Francisco, Oakland, San Jose, and Berkeley.
What Are the Common Garage Door Spring and Opener Issues in the SF Bay Area?
Garage door problems generally fall into two broad groups: mechanical failures centered on springs and cables, and electrical/electronic issues centered on the opener and safety devices. Mechanical faults often involve torsion or extension springs reaching end-of-life, corroded cables, or worn rollers that change door balance and motion. Electrical issues typically involve motor wear, circuit board failures, sensor misalignment, or remote and smart-opener connectivity problems that prevent safe operation. Local Bay Area factors such as frequent use, coastal humidity, and older housing stock can accelerate wear on springs and electronic components, making preventative maintenance more valuable for many homeowners. Understanding these distinctions helps homeowners run appropriate quick checks to determine whether a spring, cable, or the opener is the likely culprit.
What Are the Signs of a Broken Garage Door Spring?
Broken garage door springs usually present with clear audible and operational signals that indicate immediate safety concerns and the need for professional service. A sudden loud snap or pop when the door is operated is a classic sign that a torsion or extension spring has fractured, and that sound often coincides with the door becoming off-balance or stuck partway open. Visually, a broken torsion spring will show a gap in the coil above the door while extension spring failure often leaves the spring hanging or separated along the tracks; either condition makes manual lifting difficult and dangerous. Because springs store high tension, homeowners should not attempt DIY replacement; instead, schedule a trained technician to evaluate spring type and cycle rating before any work begins.
The Physics Behind Garage Door Springs: A Technician's Guide
Pushing a button to open your garage door before going to work seems trivial until the motor fails to lift the door. There are various explanations for a garage door malfunction, but this paper will focus on the most common of them all—a broken spring. Inspired by the fact that garage door technicians must match the right spring to the appropriate garage doors, this project produced a spring conversion calculator. This paper provides a preface and comprehensive explanation of the mechanisms of overhead garage doors. Initially, it introduces the garage door and its components, then provides a detailed explanation of a door’s lifting mechanisms, and lastly, elaborates on spring theory, focusing on the physics and calculations of spring properties.
The physics behind garage door springs, 2017
The next section explains how opener malfunctions differ, and the simple checks homeowners can perform safely. Common audible and visual signs of spring failure:
- Loud snap/pop sound: Indicates Spring fracture under tension.
- Door off-balance: One side of the door sits higher than the other or won't stay open.
- manual lift resistance: Door is hard or impossible to lift by hand, showing lost counterbalance.
This list highlights immediate indicators that warrant stopping use and calling a qualified service technician.
How Can You Identify Garage Door Opener Malfunctions?
Opener malfunctions often start with symptoms that are distinct from spring failures and can be isolated with safe homeowner checks before a technician visit. Common opener signs include unusual grinding or humming noises from the motor, intermittent or complete loss of response to remotes, and the door reversing unexpectedly due to sensor misalignment or electronic faults. Homeowners can safely test the opener by checking power at the outlet, replacing remote batteries, and visually confirming that safety sensors are aligned and free of debris; if these steps don’t restore normal operation, professional diagnostics are required. More complex issues—like intermittent board failures or smart-opener connectivity problems—require trained technicians with manufacturer tools to trace electrical faults and test control board function. The following section provides a concise Bay Area cost guide to help you plan for repairs or replacement. Quick homeowner checks for openers:
- Power and outlet check: Confirm outlet supplies power without overloading.
- Remote and battery swap: Rule out simple transmitter failures.
- Sensor alignment: Ensure safety eyes are clean and directly facing each other.
These checks separate simple fixes from issues that need professional diagnostic equipment.
How Much Does Garage Door Spring and Opener Repair Cost in the SF Bay Area?
Garage door spring and opener repair cost in the SF Bay Area varies by service type, spring design, door size, and whether the job is scheduled or an emergency callout. Typical cost drivers include parts (torsion vs extension springs, cables), labor time, opener model and electronics, travel time within specific Bay Area cities, and after-hours premiums. Current ranges reflect the higher labor market in this region, with torsion spring replacement generally costing more than extension springs due to complexity and safety controls. A clear cost table below compares common services and representative SF Bay Area price ranges so homeowners can set realistic expectations before booking service. This table compares typical local cost ranges for common spring and opener services in the SF Bay Area.
Service | Component | Typical SF Bay Area Price |
|---|---|---|
Torsion spring replacement | Parts + labor (single spring) | $250–$450 |
Extension spring replacement | Parts + labor (pair) | $150–$350 |
Opener diagnostics & minor repair | Motor, sensors, remotes | $120–$350 |
Opener full replacement | New unit + installation | $400–$900+ |
These ranges illustrate how spring type and opener scope affect pricing; torsion springs and full opener replacements push costs higher due to safety controls and labor complexity. The following sub-sections break down spring and opener cost components and explain emergency surcharges.
What Is the Cost Breakdown for Garage Door Spring Replacement?
Spring replacement cost breaks down into parts, labor, and occasionally additional hardware like drums, cables, or brackets; torsion springs are typically higher cost due to specialized winding tools and safety procedures. Parts cost depends on spring type and cycle rating, with higher-cycle springs costing more but offering longer lifespan; labor includes safe containment, tensioning, balance testing, and disposal of old springs. The life expectancy (cycle rating) directly influences long-term value—for example, selecting a higher-cycle torsion spring increases upfront cost but reduces future replacement frequency. When planning, consider that heavier doors and custom sizes can require more robust springs and slightly higher labor time to ensure proper balance and safety.
Component | Attribute | Typical Bay Area Range |
|---|---|---|
Spring type | Torsion vs extension | Torsion typically higher cost |
Parts | Spring unit and hardware | $60–$220 depending on rating |
Labor | Removal, installation, tuning | 0.5–2 hours; variable hourly rates |
Balancing upfront cost with cycle rating gives homeowners a clearer lifecycle cost comparison before choosing spring options.

How Much Does Garage Door Opener Repair Typically Cost?
Opener repair costs vary widely by fault—sensor adjustments and remote reprogramming are low-cost fixes, while motor or circuit board replacement can approach the price of a new unit. Diagnostics fees often cover an initial inspection and basic tests, then technicians provide a repair estimate that reflects parts and labor; brand differences and the availability of replacement boards influence whether repair or replacement is more economical. For smart openers, component costs for Wi-Fi modules or control boards may be higher and sometimes make full unit replacement competitive when factoring in warranty and expected remaining lifespan. Opener repair cost breakdown:
- Diagnostics fee: Covers inspection and basic tests, often credited toward repair.
- Minor repairs: Sensor realignment or remote reprogramming typically under $200.
- Major repairs/replacements: Motor or control board work can range from $300 to $900 depending on model.
These categories show when repair is cost-effective and when replacement becomes a practical choice.
How Do Emergency Garage Door Repairs Affect Pricing?
Emergency or after-hours repairs usually include a surcharge to compensate for technician dispatch outside normal scheduling and for quicker response priorities. Emergency surcharges are typically a percentage or flat premium added to the base repair estimate, and they reflect both urgency and the logistics of rapid deployment across the Bay Area. Homeowners should weigh immediate safety needs—such as a door that won’t close at night or a stuck door blocking egress—against the extra cost of emergency service. If the situation allows, scheduling a daytime appointment can reduce costs without compromising safety. Emergency pricing considerations:
- After-hours surcharge: A premium added to base labor for nights/weekends.
- Faster response: Prioritization may reduce wait time but increase cost.
- When to use: Unsafe conditions, security concerns, or blocked access.
Choosing emergency service is justified by safety and security, but non-urgent repairs are often cheaper when scheduled during regular hours.
What Is the Typical Timing for Garage Door Spring and Opener Repairs?
Timing for garage door repairs ranges from quick on-site fixes completed in under an hour to multi-day projects that require ordering specialty parts or coordinating replacements for large doors. Typical job durations depend on the service: spring replacements are often completed the same day if parts are on hand, while opener motor or board replacements may take longer if specific components must be ordered. Access challenges—narrow driveways, custom door sizes, or multi-panel doors—also extend work time through additional setup and testing. Understanding typical time windows helps homeowners plan for technician arrival, vehicle access, and any temporary loss of garage use.
How Long Does It Take to Replace a Garage Door Spring?
A standard torsion or extension spring replacement for a residential door typically takes between 45 minutes and 2 hours when the correct parts and tools are available, including safe containment, removal of the old spring, installation of the replacement, and balance testing. Two-spring systems or doors with unusual hardware can increase time due to the need to tension both sides evenly and verify cable alignment across the drum or pulley. The process also includes safety checks, lubrication of moving parts, and multiple open/close cycles to ensure consistent operation; if a replacement spring must be ordered, scheduling may extend to the next business day. Time factors for spring replacement:
- Parts availability: On-hand vs ordered parts change timelines.
- Door complexity: Two-spring systems or heavy doors take longer.
- Testing and tuning: Balance and cycle tests add time but ensure safety.
These factors determine whether a same-day visit resolves the issue or whether follow-up is needed.
What Is the Repair Timeline for Garage Door Opener Issues?
Opener diagnostics are often quick—30 to 60 minutes—when problems are sensor or remote-related, but full motor or control board replacements require additional time for ordering parts and performing electrical testing. Simple fixes like sensor realignment, track lubrication, or remote programming can frequently be handled during a single appointment, whereas smart-opener module replacement may need manufacturer-specific parts and firmware checks that extend the timeline. Scheduling considerations and parts lead times mean homeowners should expect immediate fixes when possible but be prepared for multi-day timelines for major electronics or out-of-stock components. Planning for potential parts procurement reduces frustration and sets realistic expectations for garage access during repairs. Opener timeline considerations:
- Quick fixes: 30–60 minutes for sensors, remotes, or mechanical adjustments.
- Major replacements: Several hours on-site plus parts lead time as needed.
- Ordering parts: Manufacturer components can add days to the repair window.
Knowing these timelines helps homeowners decide whether to seek temporary manual solutions or schedule a full repair.

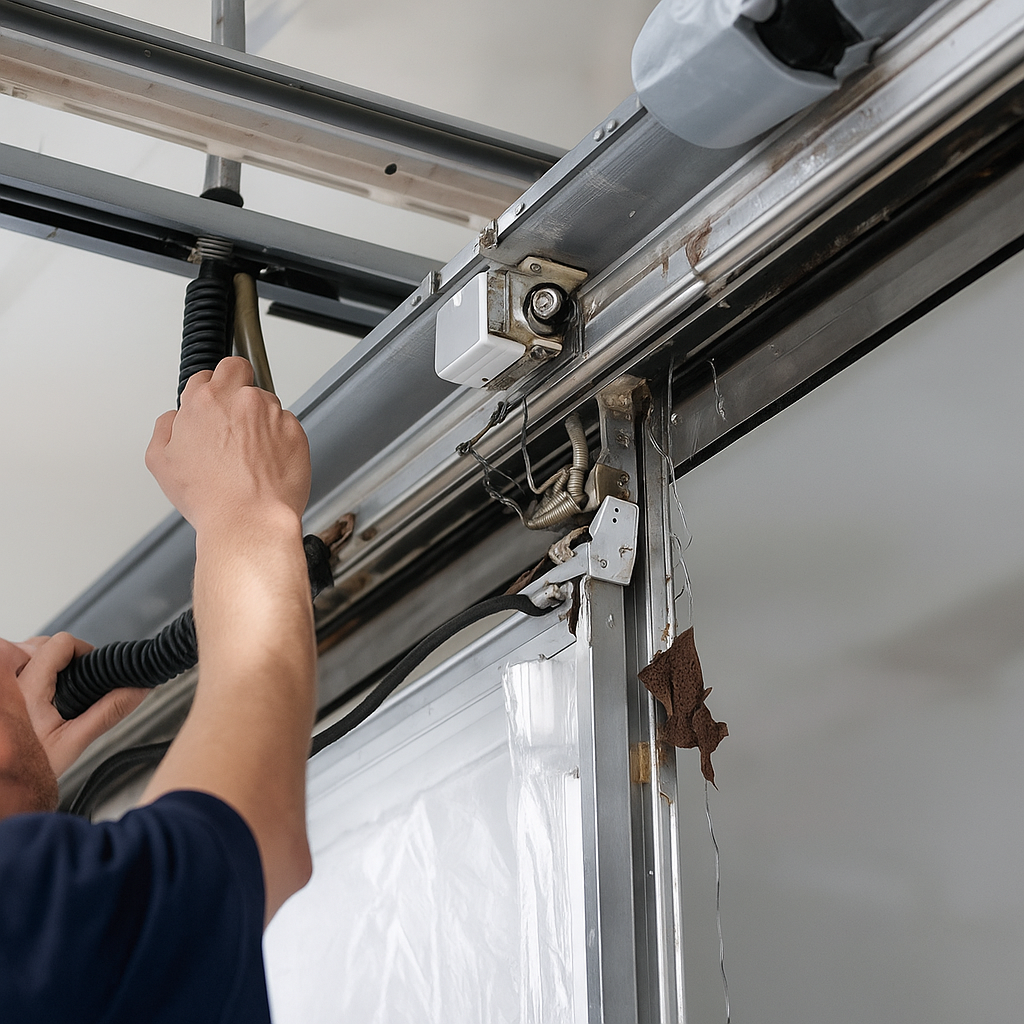
What Does a Garage Door Technician Do During Spring and Opener Repairs?
A professional technician follows a structured workflow that begins with a systematic inspection and ends with safety testing and homeowner education, ensuring repairs address root causes rather than symptoms. The workflow typically includes a visual inspection of springs, cables, tracks, rollers, and the opener; a balance and manual lift test to confirm counterbalance; diagnostic checks of the opener's electronics and sensors; and a parts assessment to determine repair scope. Technicians use specialized tools—spring winding bars, cable tension gauges, multimeters, and diagnostic software for smart openers—to perform precise adjustments and to verify safe tension and alignment. After repairs, the technician runs multiple open/close cycles, checks safety reverse function, and documents the work done so the homeowner understands maintenance recommendations. This EAV table breaks down technician actions, tools used, expected duration, and typical parts required for common spring and opener repairs.
Action | Attribute | Typical Value |
|---|---|---|
Diagnosis | Visual + operational tests | 15–30 minutes |
Spring replacement | Tools & safety gear | Winding bars, containment, 30–90 minutes |
Opener repair | Electronic diagnostics | Multimeter, software, 30–120 minutes |
QA testing | Cycle testing & sensor checks | 10–20 cycles, final verification |
How Do Technicians Diagnose Garage Door Spring and Opener Problems?
Technicians begin diagnosis by separating mechanical balance issues from opener faults through a set of targeted tests: visual inspection for broken springs or damaged cables; manual disconnect of the opener to perform a manual lift test; and applying diagnostic modes on the opener to read error codes or observe motor behavior. A balance test measures whether the door weighs evenly and holds position at mid-stroke, indicating proper spring function, while opener diagnostics can reveal motor overload, limit setting errors, or sensor faults. Technicians also use instruments like multimeters to verify voltage and continuity and may simulate remote inputs to reproduce intermittent faults. These steps determine whether the repair requires spring work, opener electronics repair, or both, and the next section outlines the safety-first repair sequence technicians follow. Diagnostic checklist technicians follow:
- Visual inspection: Look for broken springs, frayed cables, and worn hardware.
- manual lift test: Disconnect opener to evaluate door balance and manual operation.
- Opener diagnostics: Use opener diagnostic modes and electrical testing to isolate electronic issues.
This checklist reduces misdiagnosis and ensures technicians target the true fault.
What Are the Safety Protocols and Repair Steps Technicians Follow?
Safety is intrinsic to spring and opener service because springs store dangerous levels of energy and openers involve electrical hazards; technicians follow strict PPE use, lockout/tagout of power, and spring containment measures. Standard protocols include disconnecting power to the opener, securing the door in a raised position with clamps or locking pliers during spring removal, using proper spring winding bars and containment tools, and never releasing spring tension without approved tools and training. For opener work, technicians verify electrical isolation, inspect wiring for damage, and observe manufacturer torque and limit settings before re-energizing the unit. Technicians often carry replacement parts and document torque and tension settings for future maintenance, and the following QA tests confirm repair quality before leaving the site. Core safety steps in repair:
- PPE and electrical isolation: Gloves, eye protection, and power disconnect.
- Spring containment: Use specialized tools and clamps to control stored energy.
- Controlled tensioning: Wind springs to specified torque and verify balance.
Adhering to these steps prevents injury and ensures reliable functioning after repair.
How Do Technicians Test and Ensure Quality After Repairs?
Post-repair QA involves a series of standardized tests that confirm door balance, safety reverse, sensor alignment, and consistent opener operation under load; technicians document results and recommend follow-up intervals. Tests include multiple full-cycle operations to observe smoothness, checking that the auto-reverse engages when the door encounters an obstacle, confirming sensor signal continuity and alignment, and verifying that manual release and emergency functionalities operate correctly. Technicians also inspect roller movement and track alignment under load, adjust limit switches for accurate travel endpoints, and re-lubricate moving parts to optimize long-term performance. A typical recommendation is a follow-up check within a few months or an annual tune-up to catch wear before it leads to failure.QA test list:
- Balance and cycle testing: Multiple open/close cycles to verify smooth motion.
- Safety reverse checks: Obstruction simulation to confirm auto-reverse response.
- Sensor and remote verification: Confirm alignment and control synchronization.
These QA procedures complete repair work and provide homeowners with documented assurance of safe operation.
When Should You Repair vs. Replace Your Garage Door Spring or Opener?
Deciding to repair or replace depends on component age, cumulative repair costs, expected remaining lifespan, and feature needs like smart-opener upgrades or extended warranties. For springs, age and cycle rating are decisive: older springs approaching their rated cycles or showing repeated failures generally warrant replacement rather than incremental repairs. For openers, frequent electronic failures, obsolete control boards, or desire for modern features (Wi-Fi, smartphone control) often justify replacement, especially when repair costs approach or exceed the remaining value of a reliable new unit. A decision matrix helps homeowners compare repair cost against expected remaining service life and upgrade benefits to reach a safety-first, cost-effective choice. This decision matrix clarifies repair vs. replacement criteria for springs and openers.
Component | Key Factor | Decision Indicator |
|---|---|---|
Spring | Age/cycle rating | Replace if near or past rated cycles |
Spring | Repeated failures | Replace rather than repeated repairs |
Opener | Repair cost vs replacement | Replace if repair >50–60% of new unit cost |
Opener | Desired features | Replace to gain smart features or warranty |
What Factors Determine the Need for Spring Replacement Instead of Repair?
Spring replacement is warranted when signs of irreparable damage appear, when cycle life is exhausted, or when repeated failures indicate systemic wear that repairs cannot economically fix. Rusted or visibly cracked springs, overt metal fatigue, and multiple prior repairs are strong indicators that replacement is the safer and more cost-effective option. Cycle ratings provide a quantifiable threshold—springs near their rated number of cycles are more likely to fail soon and should be replaced proactively to avoid sudden breakdowns. Safety considerations also mandate replacement when components show progressive deterioration; because springs control door counterbalance, failing to replace compromised springs increases the risk of door collapse or injury. Replacement triggers for springs:
- Visible fatigue or cracking: Structural damage that compromises integrity.
- Near or past cycle rating: Predictable end-of-life based on usage.
- Repeated failures: Indicates other components or wear require full replacement.
These factors prioritize homeowner safety and minimize cumulative repair costs.
How Do You Decide Between Repairing or Replacing a Garage Door Opener?
Opener decision-making balances the age of the unit, frequency of failures, cost of replacement parts, and desired features such as smart integration or improved battery backup. If a unit is older and repair requires expensive control board or motor replacement, a full unit replacement may be more economical and provide updated safety features and warranty coverage. Conversely, for relatively new openers with isolated failures—such as a misaligned sensor or worn gear—repair can extend service life at lower cost. Consider warranty status and availability of compatible parts; when parts are scarce or expensive, replacement becomes the practical option to restore long-term reliability. Opener decision checklist:
- Age and failure history: Frequent failures signal replacement.
- Repair cost comparison: Compare repair estimate to replacement price point.
- Feature upgrade needs: Replace to add Wi-Fi, backup battery, or safety improvements.
Applying this checklist ensures choices align with safety, budget, and desired functionality.
How Can Homeowners Maintain Garage Door Springs and Openers to Prevent Repairs?
Regular maintenance extends the lifespan of springs and openers and reduces sudden failures; a simple homeowner maintenance routine includes lubrication, visual inspections, balance checks, sensor cleaning, and keeping opener firmware or remotes updated where applicable. Seasonal checks—spring and fall—catch rust, loose hardware, and wear before they become critical, while monthly quick visual inspections for frayed cables or missing components help identify urgent issues. Homeowners should avoid attempting spring tension adjustments and instead focus on safe tasks like lubricating rollers and hinges with manufacturer-recommended products, tightening loose hardware, and keeping tracks clear of debris. Consistent basic maintenance lowers the probability of emergency service calls and helps maintain smooth, quiet operation.
What Are the Essential Garage Door Maintenance Tips for Springs and Openers?
Homeowner-maintainable tasks are limited but impactful: apply lubricant to rollers, hinges, and springs (where recommended), clean and align safety sensors, test auto-reverse monthly, and replace remote batteries periodically to prevent erratic behavior. Use silicone or lithium-based lubricants designed for garage hardware and avoid heavy greases that attract dust; keep sensors free of spiderwebs, dirt, and paint that block the infrared beam. Perform a manual lift test every few months after disconnecting the opener to confirm balanced operation—if the door is hard to lift or slams shut, schedule a professional inspection. These tasks preserve components and reveal issues early, reducing repair frequency and extending component life. Maintenance checklist for homeowners:
- Lubricate moving parts: Use recommended lubricants on rollers and hinges.
- Clean and align sensors: Ensure unobstructed safety eye beams.
- Test auto-reverse and balance: Monthly functional checks to detect issues early.
Following this checklist supports safe daily operation and minimizes surprise failures.
When Should You Schedule Professional Garage Door Tune-Ups in the SF Bay Area?
Schedule a professional tune-up at least once annually, and consider pre-winter or pre-summer service if your door sees heavy seasonal use; additional triggers include unusual noises, increased vibration, or any changes in door balance. Professional tune-ups include a comprehensive inspection, spring and cable assessment, opener diagnostics, lubrication of components, and adjustment of limit and force settings to manufacturer specifications. Event-based triggers—after storms, seismic events, or after physical impacts—also justify a prompt professional check to catch hidden damage. Regular professional attention complements homeowner maintenance to preserve safety, performance, and long-term value. When to call for professional tune-ups:
- Annual preventive service: Routine tune-up to catch wear early.
- After major weather or impacts: Inspect for hidden misalignment or damage.
- When unusual noises or performance changes occur: Address early to avoid escalation.
These intervals and triggers create a maintenance cadence that keeps garage door systems reliable and safe.
Frequently Asked Questions
What Should I Do If My Garage Door Springs Are Making Noises?
If your garage door springs are making unusual noises, such as squeaking or grinding, it may indicate a need for lubrication or that the springs are under excessive tension. Start by checking for any visible signs of wear or damage. If the noise persists after lubrication, it’s advisable to contact a professional technician. They can assess the condition of the springs and determine if they need adjustment or replacement to ensure safe operation.
How Often Should I Schedule Professional Maintenance for My Garage Door?
It is recommended to schedule professional maintenance for your garage door at least once a year. However, if your door experiences heavy usage or if you notice any unusual noises or performance issues, more frequent inspections may be necessary. Regular maintenance helps identify potential problems early, ensuring the longevity of your garage door system and preventing costly repairs down the line.
Can Weather Conditions Affect My Garage Door's Performance?
Yes, weather conditions can significantly impact your garage door's performance. Extreme temperatures can cause metal components to expand or contract, leading to misalignment or increased wear. Additionally, humidity can lead to rust on springs and other metal parts. Regular maintenance, including lubrication and inspections, can help mitigate these effects and ensure your garage door operates smoothly regardless of the weather.
What Are the Risks of Ignoring Garage Door Issues?
Ignoring garage door issues can lead to more severe problems, including complete failure of the door, which can pose safety risks. A malfunctioning door may not close properly, creating security vulnerabilities, or it may fall unexpectedly, causing injury or damage. Additionally, neglecting maintenance can result in costly repairs or replacements. Addressing issues promptly ensures safety and prolongs the lifespan of your garage door system.
How Can I Tell If My Garage Door Needs a New Opener?
Signs that your garage door may need a new opener include frequent malfunctions, such as the door not responding to the remote, unusual noises during operation, or the door reversing unexpectedly. If repairs become increasingly costly or if the opener lacks modern features like smartphone control, it may be more economical to invest in a new unit. Assessing the age and performance of your opener can help determine if replacement is necessary.
What Maintenance Tasks Can I Perform Myself?
Homeowners can perform several maintenance tasks themselves, such as lubricating moving parts, cleaning safety sensors, and checking the balance of the door. Regularly inspecting for frayed cables or rusted components is also beneficial. However, for any repairs involving springs or electrical systems, it is best to contact a professional to avoid safety hazards. Simple maintenance can help extend the life of your garage door and prevent major issues.
What Should I Look for When Choosing a Garage Door Repair Service?
When choosing a garage door repair service, consider factors such as the company’s reputation, customer reviews, and experience in the industry. Ensure they are licensed and insured, which protects you in case of accidents. Additionally, inquire about their warranty on parts and labor, as well as their response time for emergency repairs. A reliable service will provide transparent pricing and a detailed explanation of the work needed.
What Are the Benefits of Regular Garage Door Maintenance?
Regular garage door maintenance is essential for extending the lifespan of your door and its components. By performing routine checks and maintenance tasks, such as lubrication, visual inspections, and balance tests, homeowners can identify potential issues before they escalate into costly repairs. Regular maintenance also ensures that the door operates smoothly and quietly, enhancing convenience and safety. Additionally, a well-maintained garage door can improve energy efficiency and reduce wear on the opener and springs, ultimately saving homeowners money in the long run.
How Can I Improve the Lifespan of My Garage Door Springs?
To improve the lifespan of your garage door springs, regular maintenance is key. This includes lubricating the springs and other moving parts with appropriate lubricants, performing visual inspections for signs of wear or rust, and ensuring that the door is balanced correctly. Avoiding excessive force when opening or closing the door can also prevent unnecessary strain on the springs. Additionally, scheduling professional inspections at least once a year can help catch any issues early, ensuring that your springs remain in good condition for as long as possible.
What Should I Do If My Garage Door Is Stuck?
If your garage door is stuck, first check for any visible obstructions in the tracks or around the door. Ensure that the opener is functioning by checking the power supply and remote batteries. If the door is still stuck, it may be due to a spring or cable issue, which can be dangerous to handle without proper training. In such cases, it’s best to contact a professional technician who can safely diagnose and resolve the problem without risking injury or further damage to the door.
Are There Any DIY Repairs I Can Safely Perform on My Garage Door?
While some minor maintenance tasks can be performed by homeowners, such as lubricating moving parts and cleaning safety sensors, most repairs should be left to professionals due to safety concerns. DIY repairs on springs or openers can be hazardous, as these components are under high tension and involve electrical systems. Homeowners should focus on regular inspections and maintenance, and contact a qualified technician for any repairs that require specialized tools or knowledge to ensure safety and proper functioning.
How Do I Choose the Right Garage Door Opener for My Needs?
Choosing the right garage door opener involves considering several factors, including the size and weight of your door, the type of drive system (chain, belt, or screw), and desired features such as smart technology or battery backup. Assess your budget and the level of noise you can tolerate, as some openers operate more quietly than others. Additionally, consider the warranty and customer support offered by the manufacturer. Researching different models and reading reviews can help you make an informed decision that meets your specific needs.
What Are the Signs That I Need to Replace My Garage Door Opener?
Signs that you may need to replace your garage door opener include frequent malfunctions, such as the door not responding to remotes, unusual noises during operation, or the door reversing unexpectedly. If repairs become costly or if the opener is outdated and lacks modern features like smartphone control, replacement may be more economical. Additionally, if the opener is nearing the end of its expected lifespan, it may be wise to invest in a new unit to ensure reliable operation and enhanced safety features.
Conclusion
Understanding the intricacies of garage door spring and opener repair empowers homeowners to make informed decisions, ensuring safety and functionality. By recognizing common issues and their associated costs, you can effectively budget for necessary repairs and maintenance. Regular upkeep not only extends the lifespan of your garage door components but also enhances convenience and security. For expert assistance and a comprehensive range of services, contact our team today to keep your garage door operating smoothly.